

So this is a project I actually did a few weeks back and have been intending to write up. Before we get started, pitfalls of using NXG:
- It’s best to install the NI Web Server on your development machine so you can use the debugging tools.
- CORS implementation on your own machine would be helpful, setup your web server to send this with .htaccess as otherwise your actual server will kick back that no cross origin header is present.
- Translating data through JSON can be tricky and tedious, I like to have a separate WebVI which takes a string of my JSON rather than making the actual request during development. This means I can run directly on my development machine without the CORS issue and inspect my data only.
- NXG does not come with some of the LabVIEW VI’s you might expect from experience, it’s purely a UI generator really.
- LabVIEW itself doesn’t happily run on Linux and you can’t build web services in Linux LabVIEW so your backend system unless you’re running on a Windows server (who does that?!) will need to be built in other languages.
As you can tell, already some challenges to face, thankfully I saved every tab I used so we can see the adventure of traversing these challenges. So first I need to decide what the demo will be, well I wanted a graph of data obviously. I also wanted a way to control the data being generated such as sample rate, max, min and also I wanted to display the time so you could see it was updating. A final component was to control whether there was output and whether or not the program was running in the background.
I decided on the backend being PHP to handle requests but python to generate the data as these seemed like the easiest and correct languages to use. I also wanted to get the CPU usage to verify how my server was doing under the pressure of running all these requests frequently. That was easy to do:
https://stackoverflow.com/questions/22949295/how-do-you-get-server-cpu-usage-and-ram-usage-with-php
<?php
function get_server_cpu_usage(){

    $load = sys_getloadavg();
    return $load[0];

}
echo get_server_cpu_usage();
?>
I needed somewhere to store, retrieve and set my data so naturally created a JSON file for this:
{"minimum":1,"maximum":10,"updaterate":500,"power":1,"output":1}To then get the data was simple enough in it’s own getdata.php file:
<?php
// Get the contents of the JSON file
		header( 'Access-Control-Allow-Origin: ' . '*' );
		header( 'Access-Control-Allow-Methods: OPTIONS, GET, POST, PUT, PATCH, DELETE, PUSH' );

header( 'Access-Control-Allow-Origin: ' . '*' );
$strJsonFileContents = file_get_contents("data.json");
echo $strJsonFileContents;
?>
The header stuff is some issues I had but eventually resolved through .htaccess instead. NXG sends OPTIONS requests beforehand but doesn’t actually embed CORS into it either from apache or NXG so caused a bunch of errors to get started. In .htaccess you can fix this with conditions:
Header always set Access-Control-Allow-Headers "Authorization"
Header always set Access-Control-Allow-Methods "GET"
Header always set Access-Control-Expose-Headers "Content-Security-Policy, Locat$
Header always set Access-Control-Max-Age "600"

RewriteEngine On
RewriteCond %{REQUEST_METHOD} OPTIONS
RewriteRule ^(.*)$ $1 [R=200,L]
This is a pretty good approach because it basically disabled OPTIONS and only allows GET requests within my NXG directory. I saw similar approaches here and mixed it up to get it working:
https://stackoverflow.com/questions/14467673/enable-cors-in-htaccess
For setting the data I only want to set one piece of info at a time, since decoding the JSON will setup a key based array, I used this fact to make it easy to change the data:
// Get the contents of the JSON file
$strJsonFileContents = file_get_contents("data.json");
// Convert to array
$array = json_decode($strJsonFileContents, true);

$array[$_POST['command']] = intval($_POST['message']);

// encode array to json
$json = json_encode($array);
//write json to file
file_put_contents("data.json", $json);
So now we have some data to set and retrieve that we can use in NXG, let’s get that up and running. Here was my UI:
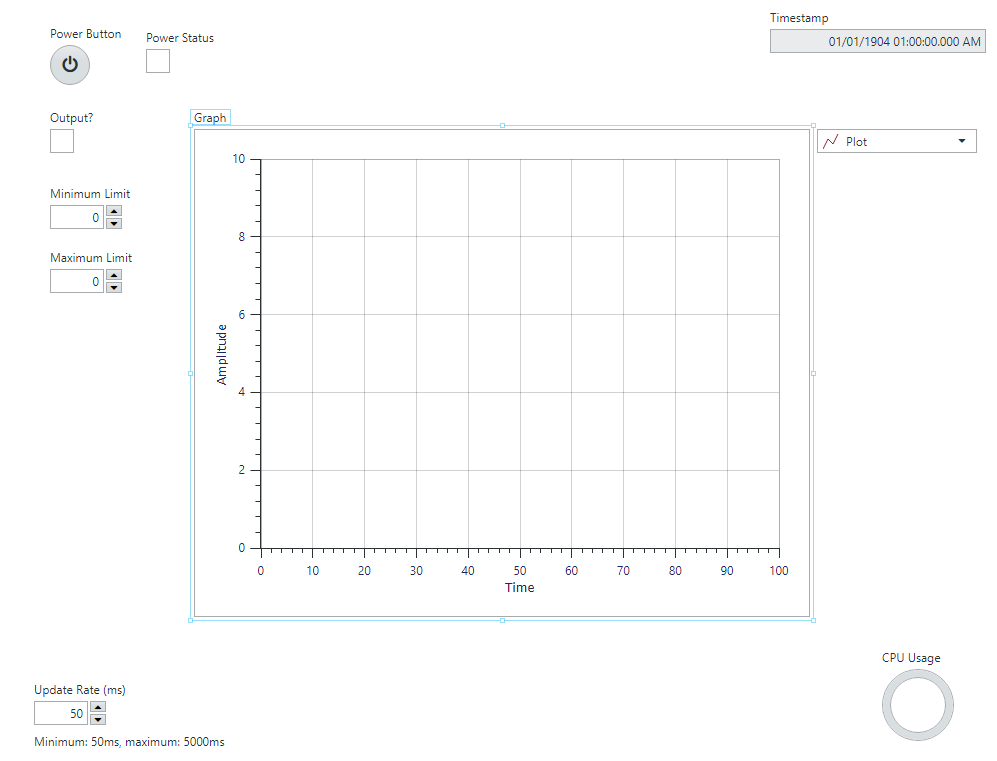
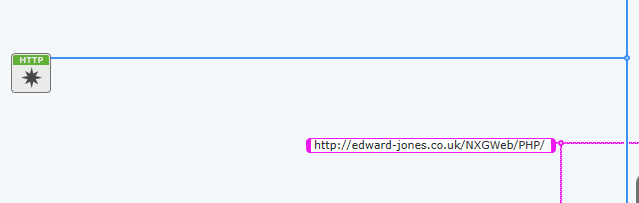
With each loop they will all use HTTP handles and a string pointing to the directory where I’ve put the PHP files, so I’ll show this first so you know what we’ll be missing out of showing the loops:
So first thing is to get the data and then show this by updating my UI’s.
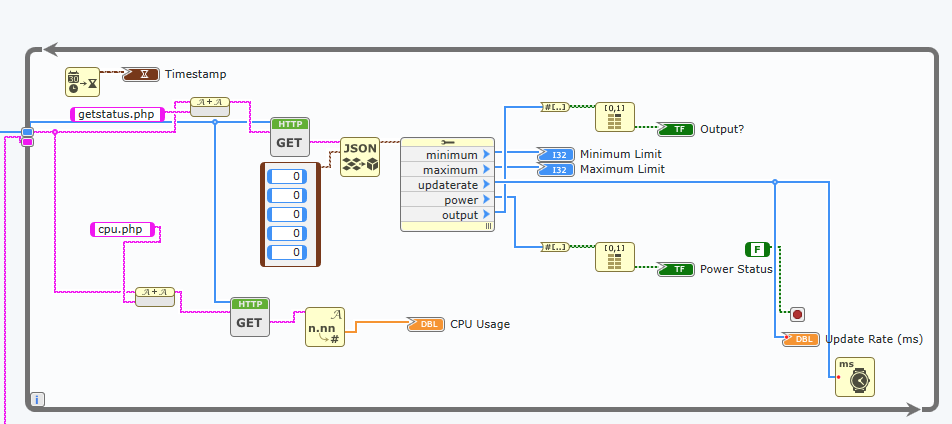
There’s not much to comment on here that was specialist. Except that the JSON consumes a cluster which needs to represent your data and the constant values within it need to have the same name as the JSON object you want put here. Mentioned in the documentation:
https://www.ni.com/documentation/en/labview/latest/node-ref/unflatten-from-json/
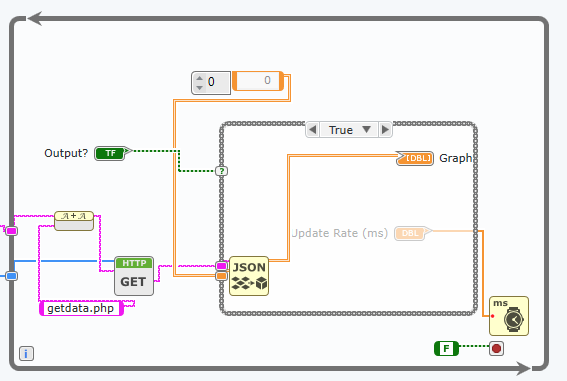
Similarly our graphing loop:
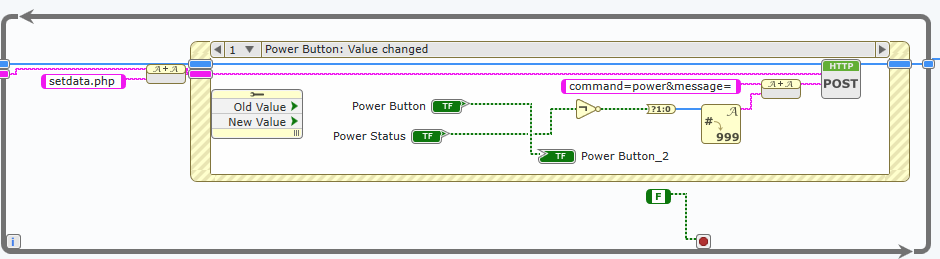
And then finally, our loop which uses an event structure and when a data point is changed it sends this to our PHP file I showed earlier for setting the data in the JSON.
Well that all seemed easy, what next? Well, create our data, prior to this project I hadn’t really used Python too much in the past, never with an actual purpose anyway! So this was a great starting point as it required two things:
- Read/Write to JSON
- Generate a wave
Generating the data wasn’t too difficult, there’s plenty of documentation that got me to my answer:
https://numpy.org/doc/stable/reference/generated/numpy.sin.html
https://www.kite.com/python/answers/how-to-add-noise-to-a-signal-using-numpy-in-python
import numpy as np
import time

def genSine(f0, fs, dur, min, max):
    t = np.arange(dur)
    sinusoid = np.sin(2*np.pi*t*(f0/fs))
    #sinusoid = normalise(sinusoid)
    noise = np.random.normal(0, .1, sinusoid.shape)
    sinusoid = (sinusoid * ((max-min)/2))+ noise + ((max-min)/2) + min
    return sinusoid
Similarly examples for how to read/write JSON weren’t hard to find:
https://www.programiz.com/python-programming/json
The problem I had was that I had setup Python on GoDaddy by compiling it myself which proved tedious, it was a similar method to my article on Git installing. Now that I’ve moved to my own server and have sudo privileges it’s been much easier to manage and setup so I would recommend either this or using GoDaddy’s inbuilt Python support instead (woops, I missed that!).
This is what I ended up with:
import numpy as np
import time
import json

def genSine(f0, fs, dur, min, max):
    t = np.arange(dur)
    sinusoid = np.sin(2*np.pi*t*(f0/fs))
    #sinusoid = normalise(sinusoid)
    noise = np.random.normal(0, .1, sinusoid.shape)
    sinusoid = (sinusoid * ((max-min)/2))+ noise + ((max-min)/2) + min
    return sinusoid

while(1):
    with open('/var/www/public_html/NXGWeb/PHP/data.json') as json_file:
        data = json.load(json_file)
    with open('/var/www/public_html/NXGWeb/sine.json', 'w') as outfile:
        json.dump(genSine(10,1000,200,data['minimum'],data['maximum']).tolist(), outfile)
        if data['power'] == 0:
            break
    time.sleep((data['updaterate'])/1000)
You’ll notice I break out of the loop if the power boolean is zero. This is because I wanted to control whether the python script was executing from my UI and found this suggestion on how to stop the script from this rather long thread where someone points out this obvious approach further down:
https://www.raspberrypi.org/forums/viewtopic.php?t=154282
Now all I need to do is have my PHP manage this and execute the code when it switches from zero to one on the power update. I simply add this to the end of my setdata.php file:
if (($_POST['command'] == "power") && ($_POST['message'] == "1")) {

    shell_exec("python3 /var/www/public_html/NXGWeb/Python/generator.py");
}
This happily uses the inbuilt function which was suggested here:
https://stackoverflow.com/questions/19735250/running-a-python-script-from-php
With all this now setup, my UI worked on the server!

I would note I limited the update rate control to have a minimum and a maximum so people couldn’t overload my server.
You can see the running demo for yourself at: