
Two articles in one week, I am getting back to basics. So I mentioned in my continuous integration of yocto article that I’ve been working on MARTe2 and refused to give a proper introduction to it. However I thought it would be good to give one.
So as I briefly explained, it’s a framework, it’s a real time one and it’s for control systems. Well, you can use it for anything, but it’s mostly used for control systems. Some people have a tendency to strongly associate it with nuclear fusion reactors but really, it can be used in any real time requiring control system.
Now if you’ve ever read my about, you’re probably thinking, but why Ed? You used to work for National Instruments, shouldn’t you use LabVIEW real-time in your control systems when real time is required? Well, there’s a few reasons I’d pick MARTe2 over LabVIEW:
- I can debug the code with a debugger as I have the source code, LabVIEW is too locked down. When I was in technical support, the setup I had to make to give R&D a sustainable way of replicating an issue was ridiculous, but with MARTe2 I simply pass a flag for debugging.
- I can edit the code to change the behaviour! I’ll talk about that one later but in my current project I’ve modified the scheduler to exit after a set period for my own benefit.
- No licensing required.
- Performance testing is possible with perf, however LabVIEW used to have this functionality but removed it after 2008 and then you would have to do this manually by wrapping your functions, what a tedious exercise.
Now when you put this argument against any proprietary software, you have very similar advantages over the proprietary, MATLAB for instance.
But I think you should have at least one person in your engineering department who likes to learn, become a pro. Thankfully in my team it’s not just me, there’s at least 3 others and we’re growing this team. But otherwise, the rest of our team build on top of our MARTe2 work in a manner of speaking. So you can have a dev level, an architect level, in this context a dev might just develop applications by generating a configuration file. An architect might actually develop the components of a MARTe2 application or possibly develop an automated generator of the application – actually more than 3 of my team are getting to this latter point, our team is becoming pretty proficient, glad to see, side note: my project managers done an excellent job at influencing them to do so, for a long time (2 months) it felt like just me.
So let’s explain what MARTe2 is. MARTe2 is of course by the 2, a successor to an initial version, MARTe. It is fully tested with a huge jenkins pipeline for QA which cost… let’s just say, I know it was a lot. MARTe the original was intended as a framework for defining a control application via a config file but it was a bit klunky and awkward to use, it’s code was difficult to interpret too. As times change, so must our code as the say. So MARTe2 was born, with a base level of documentation written in readthedocs and then because I know C++, I read the rest in the code and learn it that way, then I regurgitate it in my blogs so you don’t have to!
MARTe2 starts from what it calls Core, Core is a set level of libraries which provides an interconnected level of services towards on function or another. Primarily you have the Scheduler which will act as your supervisor of execution, it will execute what are called GAMs, GAMs are basically another word for functions – theres a few of us trying to get them renamed to functions.
App is then the thing that stitches this together. So let’s start with the standard App and then walkthrough all of it. I hope you have your c++ hat on!
So first you’ll want to grab the code, you should use linux and you can grab it from here:
https://github.com/aneto0/MARTe2.git
The first thing to notice before you git clone this is that there are several makefiles in the root directory.
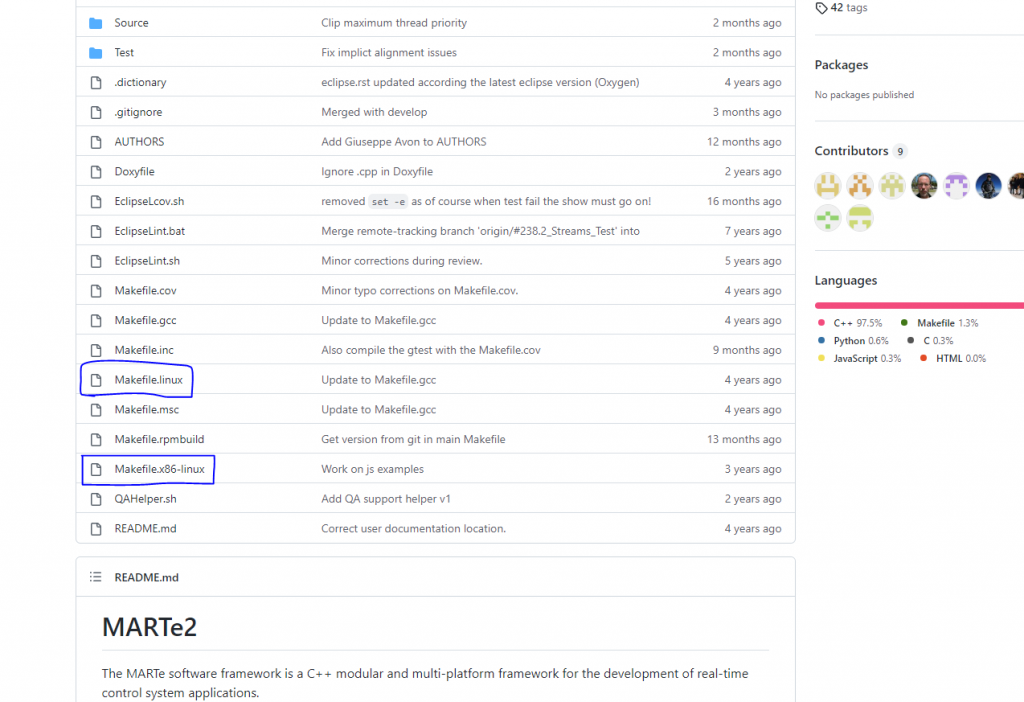
So here there are many, the two of concern are .linux and .x86-linux, they effectively define our TARGET and .linux is a 32 bit linux OS and .x86 is 64bit. For our build we’re going to git clone and build for 64 bit. Note that there are some experimental setups where people are trying to build for raspberry pi or other platforms, there’s also support for FreeRTOS from what I can tell.
cd MARTe2
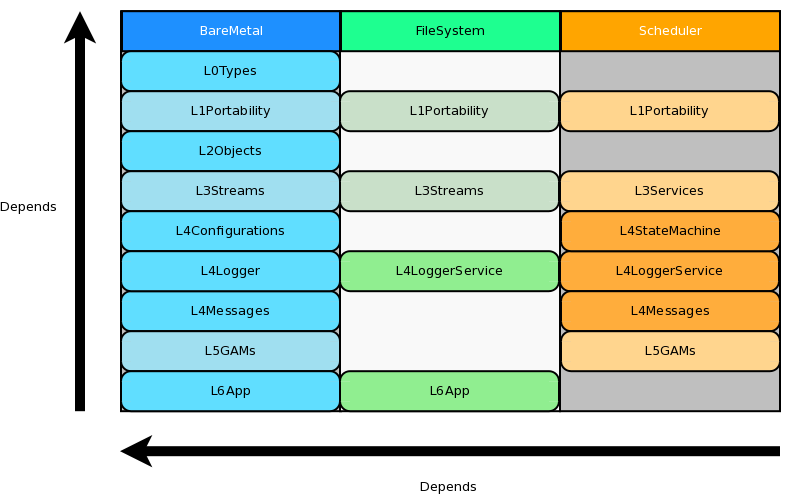
make -f Makefile.x86-linuxOnce this is built, it’s not over however, MARTe2 is modular but this isn’t the repo of modular since. This is simply a set of libraries and an application. Here is a breakdown of the libraries graphically for me to better explain this:

MARTe2 defines everything in it’s c++ world, it abstracts anything you should need OS wise to make it OS agnostic. Anything that requires a specific call to an OS specific API is usually abstracted away in the build process. Let’s take an example, a great example to start with is Bootstrap since this is in the Core but also will become relevant later when we look at the App.
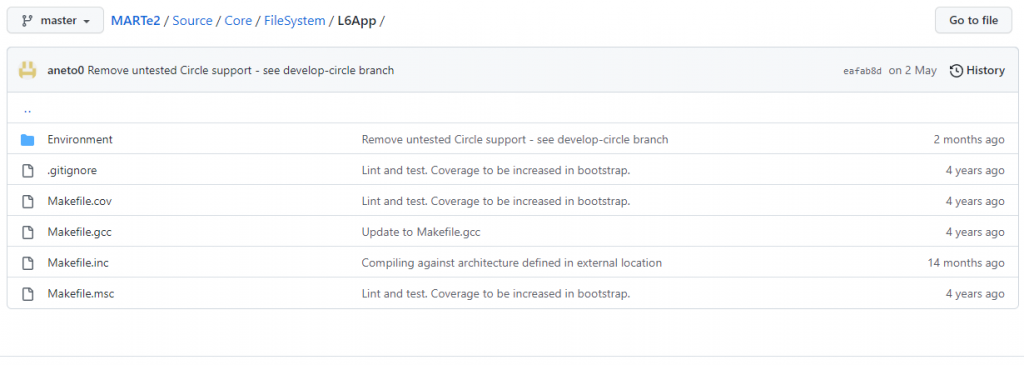
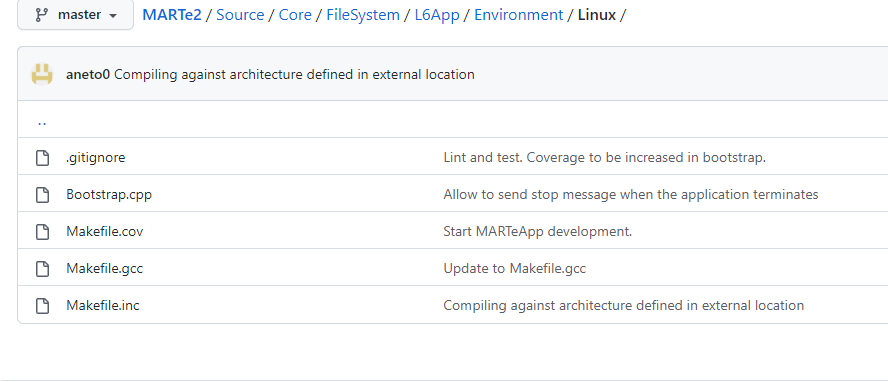
So let’s try to find Bootstrap, when we navigate to FileSystem -> L6App we see that we have no C++ files but makefiles and then an Environment folder:
So, let’s have a look at the Makefile.inc:
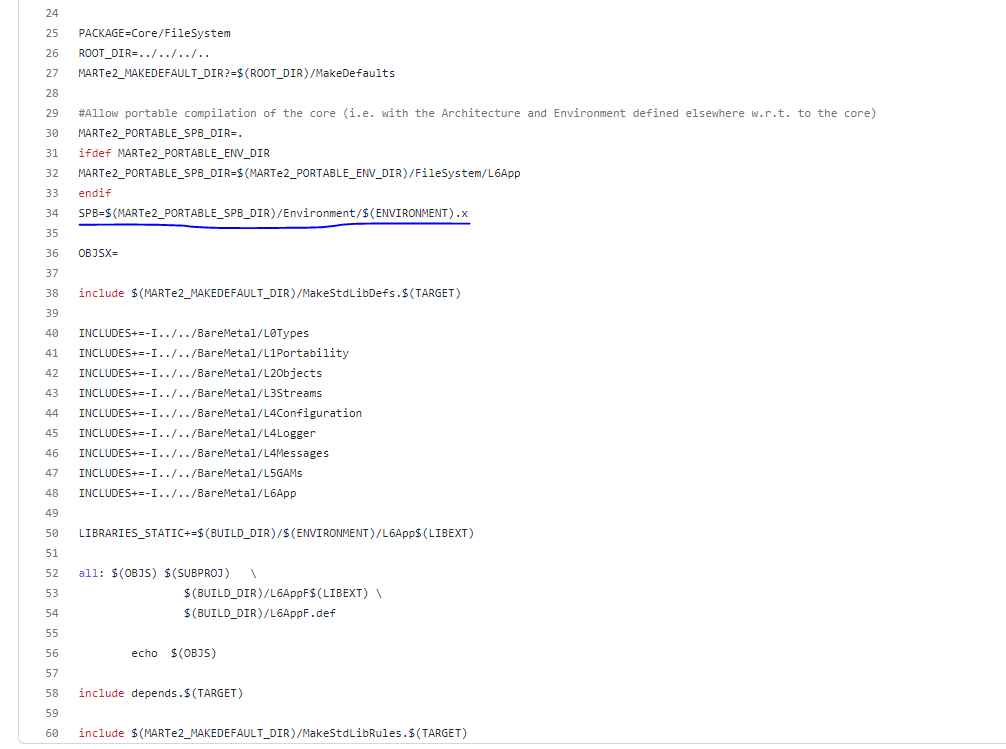
The main component here is that the Makefile knows the ENVIRONMENT and defines to add an object with the Environment name to the L6App library that it produces. Within our Linux folder we now have:
Where the Makefile defines to build the Bootstrap object and if we take a quick peak at Bootstrap.cpp:
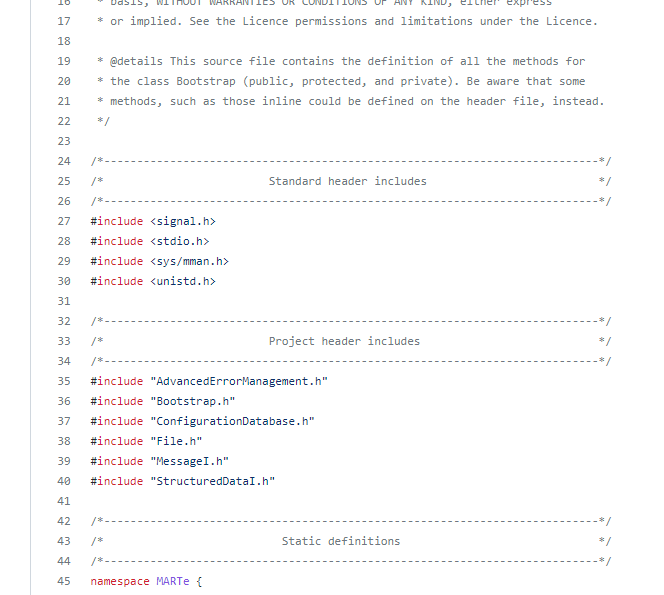
You can see here that it is now pulling in os specific header files which is why it has this sub hierarchy to be environment specific where the code needs to be.
So MARTe2 provides mostly one repo for all environments, a pretty neat but standard trick. The overall take away should be that when developing a MARTe2 application you should not need to import the OS specific headers! First look for a MARTe2 function of equivalent that you need. If there isn’t one, then I suppose you could add it by replicating this style of adding a function to a library, wrapping around it. Maybe I’ll find a good use case one day and be able to show this, I can actually think of one right now but that’s a future thing I guess.
So, anyway, this is a set of libraries which provides to our main application what is needed. You can write your own applications based on MARTe2 and there’s a load of examples on this, but for 90% of projects, I would expect that the application MARTe2 comes with is adequate for your needs since most of the application behaviour comes down to the configuration file you provide it. So let’s get onto the next bit – the modular part!
MARTe2 is made up of 3 things that sit on top of our libraries and are the part of our configuration:
- DataSources -> sources or sinks of data from MARTe2 to an external component like a file, a UDP socket, EPICS etc…
- GAMs -> Effectively functions, they take an input/s and provide output/s of data.
- Interfaces -> Something I’m still unfamiliar with but working to learn, I need to add the SysLogger to my application but not yet sure how. There’s a big duplication of Interfaces to DataSources, SysLogger seems to be the most useful, it ports the console output to a syslog. Great for closed production units.
For good practice, these components are actually stored elsewhere, you can find them here:
https://github.com/aneto0/MARTe2-components.git
In my next tutorial I’ll show you how to create a GAM as that has primarily been alot of the work I’ve done on MARTe2 in the first few months of this month – now I’m developing a generator for automating the configuration files and also working on some CI/CD stuff and pytesting for it, I’m very proud of this project, it has some great coding practices going on.
Anyway, blah blah blah. So, let’s git clone this and then also define the MARTe2_DIR variable as this is needed for MARTe2-Components to know, where it’s linking libraries are:
git clone https://github.com/aneto0/MARTe2-components.git
cd MARTe2-components
export MARTe2_DIR=/home/MARTe2 # Or where ever you compiled it
make -f Makefile.x86-linux
So just an introductory article is seeming quite dense, I’m gonna break out the sessions into other articles where we talk more and more in depth to keep our brains from popping. But now you have everything you need to run an initial configuration.
Firstly, there are alot of examples already available and a set of instructions on the main pages readme for MARTe2 that can be found here:
https://vcis-gitlab.f4e.europa.eu/aneto/MARTe2-demos-padova/-/tree/master/Configurations
For our purposes, I’m going to setup an extremely basic system. We’re going to simply run and push our time counter (number of cycles executed) to the console so you can see that it is running.
Please note you can provide MARTe2 with several different configuration types, it supports json and a basic config from it’s predecessors style as well as a MathExpression parser and xml one:
https://vcis.f4e.europa.eu/marte2-docs/master/html/core/configuration/parser.html?highlight=json
Our configuration is already available as RTApp1-1 in demo padova, here is the code:
$TestApp = {
    Class = RealTimeApplication
    +Functions = {
        Class = ReferenceContainer
        +GAMTimer = {
            Class = IOGAM
            InputSignals = {
                Counter = {
                    DataSource = Timer
                    Type = uint32
                }
                Time = {
                    Frequency = 1
                    DataSource = Timer
                    Type = uint32
                }
            }
            OutputSignals = {
                Counter = {
                    DataSource = LoggerDataSource
                    Type = uint32
                }
                Time = {
                    DataSource = LoggerDataSource
                    Type = uint32
                }
            }
        }
    }
    +Data = {
        Class = ReferenceContainer
        DefaultDataSource = DDB1
        +LoggerDataSource = {
            Class = LoggerDataSource
        }
        +Timings = {
            Class = TimingDataSource
        }
        +Timer = {
            Class = LinuxTimer
            SleepNature = "Default"
            Signals = {
                Counter = {
                    Type = uint32
                }
                Time = {
                    Type = uint32
                }
            }
        }
    }
    +States = {
        Class = ReferenceContainer
        +State1 = {
            Class = RealTimeState
            +Threads = {
                Class = ReferenceContainer
                +Thread1 = {
                    Class = RealTimeThread
                    CPUs = 0x1
                    Functions = {GAMTimer}
                }
            }
        }
    }
    +Scheduler = {
        Class = GAMScheduler
        TimingDataSource = Timings
    }
}
Using the documentation, you can see that your application will run like so:
https://vcis.f4e.europa.eu/marte2-docs/master/html/core/app/app.html
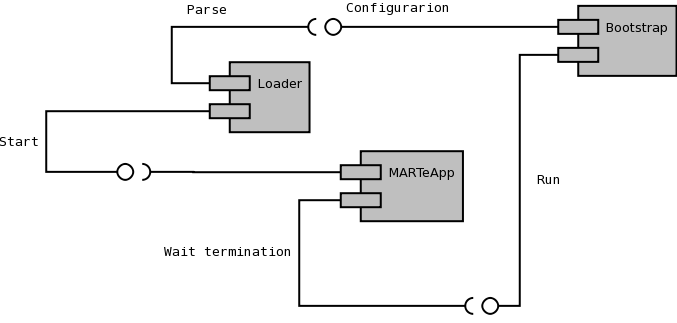
What this is trying to tell us is that the loader starts, parsers the configuration, passes this off to bootstrap and then that runs and the MARTe2App is simply waiting for bootstrap to terminate. It’s not quite like that in my opinion but it’s a good enough explanation for now.
If you went to the link above, you’ll know that you also need a script which adds all the libraries to LD_LIBRARY_PATH so the MARTe2 App can run and find the libraries it needs since it mostly works by shared linking. Some applications are developed for static to fit on small devices like STM32’s but that’s another story. Your script should be:
#!/bin/bash
#Arguments -l LOADER -f FILENAME -m MESSAGE | -s STATE [-d cgdb|strace]
#-l LOADER=The Loader to use
#-f FILENAME=MARTe configuration file
#-m MESSAGE=Start message
#-s STATE=RealTimeApplication first state
#-d cgdb=Run with cgdb
#-d strace=Run with strace

#Run with cgdb or strace?
DEBUG=""

#Consume input arguments
while [[ $# -gt 1 ]]
do
key="$1"

case $key in
    -l|--loader)
    LOADER="$2"
    shift # past argument
    ;;
    -f|--file)
    FILE="$2"
    shift # past argument
    ;;
    -m|--message)
    MESSAGE="$2"
    shift # past argument
    ;;
    -s|--state)
    STATE="$2"
    shift # past argument
    ;;
    -d|--debug)
    DEBUG="$2"
    shift # past argument
    ;;
    --default)
    DEFAULT=YES
    ;;
    *)
            # unknown option
    ;;
esac
shift # past argument or value
done

if [ -z ${MARTe2_DIR+x} ]; then echo "Please set the MARTe2_DIR environment variable"; exit; fi
if [ -z ${MARTe2_Components_DIR+x} ]; then echo "Please set the MARTe2_Components_DIR environment variable"; exit; fi

LD_LIBRARY_PATH=$LD_LIBRARY_PATH:.
LD_LIBRARY_PATH=$LD_LIBRARY_PATH:../../../../../Build/x86-linux/Examples/Core/
LD_LIBRARY_PATH=$LD_LIBRARY_PATH:Core/
LD_LIBRARY_PATH=$LD_LIBRARY_PATH:$MARTe2_DIR/Build/x86-linux/Core/
LD_LIBRARY_PATH=$LD_LIBRARY_PATH:$MARTe2_Components_DIR/Build/x86-linux/Components/DataSources/EPICSCA/
LD_LIBRARY_PATH=$LD_LIBRARY_PATH:$MARTe2_Components_DIR/Build/x86-linux/Components/DataSources/LinuxTimer/
LD_LIBRARY_PATH=$LD_LIBRARY_PATH:$MARTe2_Components_DIR/Build/x86-linux/Components/DataSources/LoggerDataSource/
LD_LIBRARY_PATH=$LD_LIBRARY_PATH:$MARTe2_Components_DIR/Build/x86-linux/Components/DataSources/DAN/
LD_LIBRARY_PATH=$LD_LIBRARY_PATH:$MARTe2_Components_DIR/Build/x86-linux/Components/DataSources/NI6259/
LD_LIBRARY_PATH=$LD_LIBRARY_PATH:$MARTe2_Components_DIR/Build/x86-linux/Components/DataSources/NI6368/
LD_LIBRARY_PATH=$LD_LIBRARY_PATH:$MARTe2_Components_DIR/Build/x86-linux/Components/DataSources/SDN/
LD_LIBRARY_PATH=$LD_LIBRARY_PATH:$MARTe2_Components_DIR/Build/x86-linux/Components/DataSources/UDP/
LD_LIBRARY_PATH=$LD_LIBRARY_PATH:$MARTe2_Components_DIR/Build/x86-linux/Components/DataSources/MDSWriter/
LD_LIBRARY_PATH=$LD_LIBRARY_PATH:$MARTe2_Components_DIR/Build/x86-linux/Components/DataSources/RealTimeThreadSynchronisation/
LD_LIBRARY_PATH=$LD_LIBRARY_PATH:$MARTe2_Components_DIR/Build/x86-linux/Components/DataSources/FileDataSource/
LD_LIBRARY_PATH=$LD_LIBRARY_PATH:$MARTe2_Components_DIR/Build/x86-linux/Components/GAMs/IOGAM/
LD_LIBRARY_PATH=$LD_LIBRARY_PATH:$MARTe2_Components_DIR/Build/x86-linux/Components/GAMs/BaseLib2GAM/
LD_LIBRARY_PATH=$LD_LIBRARY_PATH:$MARTe2_Components_DIR/Build/x86-linux/Components/GAMs/ConversionGAM/
LD_LIBRARY_PATH=$LD_LIBRARY_PATH:$MARTe2_Components_DIR/Build/x86-linux/Components/GAMs/ConstantGAM/
LD_LIBRARY_PATH=$LD_LIBRARY_PATH:$MARTe2_Components_DIR/Build/x86-linux/Components/GAMs/FilterGAM/
LD_LIBRARY_PATH=$LD_LIBRARY_PATH:$MARTe2_Components_DIR/Build/x86-linux/Components/GAMs/StatisticsGAM/
LD_LIBRARY_PATH=$LD_LIBRARY_PATH:$MARTe2_Components_DIR/Build/x86-linux/Components/GAMs/WaveformGAM/
LD_LIBRARY_PATH=$LD_LIBRARY_PATH:$MARTe2_Components_DIR/Build/x86-linux/Components/Interfaces/BaseLib2Wrapper/
LD_LIBRARY_PATH=$LD_LIBRARY_PATH:$MARTe2_Components_DIR/Build/x86-linux/Components/Interfaces/SysLogger/
LD_LIBRARY_PATH=$LD_LIBRARY_PATH:$MARTe2_Components_DIR/Build/x86-linux/Components/Interfaces/EPICS/

echo $LD_LIBRARY_PATH
export LD_LIBRARY_PATH=$LD_LIBRARY_PATH

MARTeAPP=$MARTe2_DIR/Build/x86-linux/App/MARTeApp.ex

#Start with cgdb or with strace
if [ "$DEBUG" = "cgdb" ]
then
    if [ -z ${STATE+x} ]; then
        cgdb --args $MARTeAPP -l $LOADER -f $FILE -m $MESSAGE
    else
        cgdb --args $MARTeAPP -l $LOADER -f $FILE -s $STATE
    fi
elif [ "$DEBUG" = "strace" ]
then
    if [ -z ${STATE+x} ]; then
        strace -o/tmp/strace.err $MARTeAPP -l $LOADER -f $FILE -m $MESSAGE
    else
        strace -o/tmp/strace.err $MARTeAPP -l $LOADER -f $FILE -s $STATE
    fi
else
    if [ -z ${STATE+x} ]; then
        $MARTeAPP -l $LOADER -f $FILE -m $MESSAGE
    else
        $MARTeAPP -l $LOADER -f $FILE -s $STATE
    fi
fi
It’s not a clean method but I’ll go through that in a later article. Anyway, so now we’re ready, let’s run our basic app. Assuming I saved my config as app.cfg, you’ll want this script next to your app.cfg by the way.
./MARTe.sh -l RealTimeLoader -s State1 -f app.cfgA few explanations:
- My script is called MARTe.sh as seems a common practice
- l is the loader parser (RealTimeLoader is the most commonly used)
- s is the State to enter which we defined in our configuration – you can have multiple states but only run one at a time, i.e. a statemachine.
So now this is executed, you should get a big set of text output and then finally resolving to this incrementing two lines:
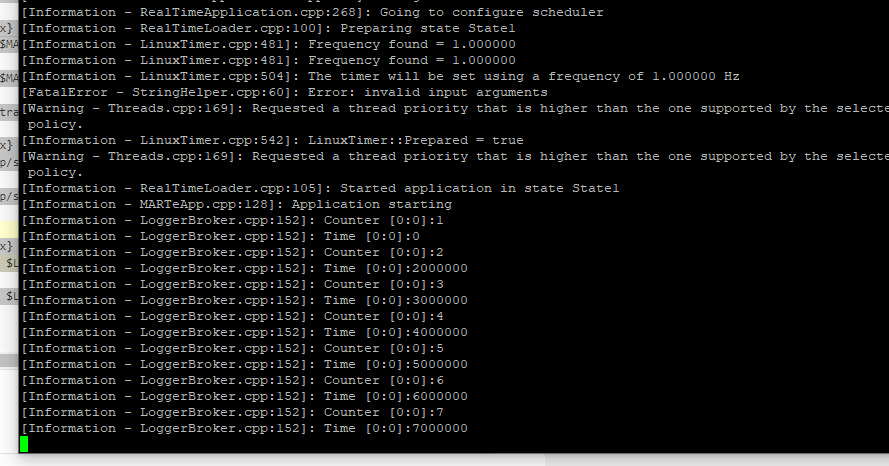
Note the FatalError line? Yeah ignore that, the StringHelper is always throwing that one out every so often at startup despite it working, I’m not sure why that happens, apparently it’s a deeply embedded “feature” that people have struggled to get rid of.
To exit the application, use Ctrl+C to trigger a shutdown, if you’re impatient, you can Ctrl+C again for an immediate abort.
I appreciate I’ve just ran through this without much explanation. Over time I’ll either flesh out this article a bit more or create other articles which describes things in better detail, for now I just wanted to get you to the point of executing a simple example and some brief overviews on things.
Some things I want to publish articles about in the future:
- A simpler startup script
- Testing the builds with QA
- Creating your own GAM
- States in MARTe2
- Building your own Scheduler
- Adding a function to the libraries of MARTe2
- Modifying the Scheduler to exit
- Creating a constant application which can interrupt and reconfigure