
One of my latest projects has evolved to a stage where I believe it’s extremely unique, possibly so unique no one has ever done this before. Therefore, perfect for writing up a blog post and about time! I’ve struggled to come up with new things to discuss or find time outside of actual work to have something noteworthy. But this, this is definitely something.
A bit of background on the project but only what is public. The project is a control system and will be using the MARTe2 framework which was developed at ITER. You can get a full overview here:
https://vcis.f4e.europa.eu/marte2-docs/master/html/overview.html
So this modular framework seems perfect for one of our projects, within which we created all new “GAMs”. If you’re familiar with LabVIEW or Simulink you can image a GAM as a block of code which takes inputs and produces outputs where it manipulates the input data based on parameters set and it’s root function. MARTe2 is in two parts, you have the main source base which comprises of App and Core. It also has a set of GTests but not all currently pass off the bat which is a known issue. You can pretty much write a MARTe2 application without ever getting into knowing the code for Core or App. Although I’m trying to learn it to get performance improvements.
You can build an application by writing a json or text cfg file (which matches a json/xml structure) and then simply run with a pre-built set of the standard code publicly available after compilation.
For our application we’re replacing an existing but difficult to modify control system where the user can select blocks of functions to run similar to what I described above, so every configuration can be different. For that, our project uses python to translate that configuration into our MARTe2 equivalent. So in our repo’s we have select pytest cases that we run through. The important one I’m running through now is it takes a set of user configured setups which basically only test one block at a time, checks the output and asserts whether we’ve passed the test based on this.
While this sounds like a simple test, it actually incorporates alot of the functions the user never see’s from the original code, getting data input, getting a concept of time which is universal to the control systems, outputting the data, checking the data input etc…
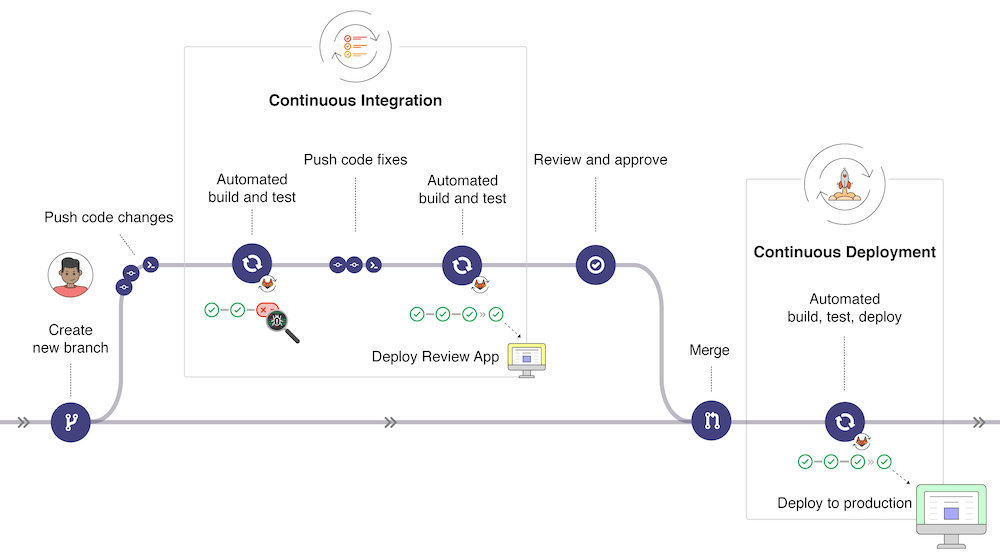
So, we’ve got a pytest, that’s great, we built a Docker for it and then starting testing in Gitlab with pipelines, we hold this on develop and have set our repo so that you can only merge into develop with a merge request and only if it’s pipeline passes. This enforces that we never break our develop branch.
The challenging part
Nothing new under the sun here right? Here’s where it gets a bit more complicated. MARTe2 requires a real time OS and also for a setup of the kernel parameters. Now I have implemented an additional level to this where we don’t just NFS boot, we do a special kind of boot it into RAM and don’t require a constant link – I guess I’ll write about that in another article so watch out for that. But let’s focus on this factor:
To setup MARTe2 you need to install/build a real time kernel, I use the preempt patch. You then need to setup the irq affinity, kernel parameters as well:
https://vcis.f4e.europa.eu/marte2-docs/master/html/deploying/linux.html
This process had us have a 27 page document for doing this manually, which isn’t very safe to do, yocto was an obvious solution, allowing us to build a reliable system. However, yocto is pretty difficult to get into Gitlab CI. The main issue is that you need a runner with enough space available and our organisation obviously limited each runners potential disk space. So to get started I mainly built my yocto builds locally. However recently I’ve managed to get this into a pipeline, what I have done is used volumes, my runner is a docker runner, running the docker image I have setup on my machine with all the tools necessary for building. My runner then has a configuration like this:

Outside of setting up a runner in the usual way, I configure the runner to have a shared volume with the host directory. Here you can see volumes is a list, exactly like you might define a list in python. Cache is an internal volume to the docker however the rest, where they show the host directory, colon, the mapped directory in the docker, colon and then the read and write flag mean we can now share between docker instances these directories in the runner. The reason I’ve done this is because yocto is inately a cached system which detects changes, so I want it to store the sstate cache, the download directory and the temp build directory on the host so that these are available between runs and speeds up the pipeline build process – each pipeline will only build if something has changed and what that change affects.
In my Gitlab CI I then build and maintain some artifacts, I enforce using the runner with tags:
builder:
    stage: build
    image: /marte-yocto/marte:yocto_latest
    script:
      - export MACHINE=intel-corei7-64-rt
      - source ./marte-oe-init-build-env
      - bitbake core-image-rt
      - wic create mkefidisk -e core-image-rt
    timeout: 5 hours 30 minutes
    variables:
       GIT_SUBMODULE_STRATEGY: recursive
    cache:
        key: one-key-to-rule-them-all
        paths:
          - ./*
    tags:
      - yocto
      - docker
    artifacts:
        paths:
            - /yocto/shared/tmp*/deploy/images/*
            - ./build/*.direct
        expire_in: 1 week
Okay now I have a yocto image, I can create releases through the next job if I like. But here’s where we get interesting:
Building a docker image from yocto
So this is the part which isn’t very well documented anywhere, you can’t just take a normal yocto image and chuck it into a docker image, it contains things like systemd which docker doesn’t handle very well, you need an image specifically matching dockers needs. That took me a while. So let’s get started with some basics:
The machine should be a qemux86-64 setup, it should also have a specialised local.conf which establishes the setup needed. Before we get onto that let’s talk about some of the main steps.
Whenever someone traditionally starts yocto they’ll source the oe-init-build-env. This however is something you can build on top of, I first saw this method with NI’s yocto repo, so I have my own script called marte-oe-init-build-env which also sources oe-init-build-env but it does some things for setup beforehand.
#!/usr/bin/env

SCRIPT_ROOT=$(realpath $(dirname ${BASH_SOURCE:-${0}}))

positionals=()

while [ $# -ge 1 ]; do case "$1" in
	*)
		positionals+=($1)
		shift
		;;
esac; done

BITBAKEDIR=${BITBAKEDIR:-${SCRIPT_ROOT}/bitbake}
BUILDDIR=${BUILDDIR:-${SCRIPT_ROOT}/build}

# define the location of bitbake configuration files, which will be copied
# into the build workspace, if one needs to be created.
TEMPLATECONF=${TEMPLATECONF:-${SCRIPT_ROOT}/meta-marte/conf}

export TEMPLATECONF
Here i basically take user input (this can be, what our build directory is. The next is the directory where we have the local.conf.sample file. Please note: meta-marte is a layer I’ve created which has additional recipes needed for our deployment. This is not a crash course in yocto, look at my other articles for this – this is a course on yocto in CI. This is just needed for context. My users can select to build, and my pipeline, either the actual machine image to run on an intel-corei7-64 bit system where it builds the linux preempt kernel based on it’s local.conf or to build a qemux86-64 version for docker. I handle this a little later in the script, this next parts fairly easy but crucial to build your own scripts, here we source the actual oe-init script:
# Reset configs
echo ${positionals[@]}

builddir=""
if [ -v 1 ]; then
	builddir=${positionals[@]}
else
	builddir=build
fi

if [ -v 1 ] && [test -f "./builddir/conf/local.conf"]; then
	rm ${builddir}/conf/templateconf.cfg ${builddir}/conf/local.conf ${builddir}/conf/bblayers.conf
fi

# Call OE-upstream's build env initialization script, which will create a build
# workspace called either "${1:-build}/" and `cd` into it.
cd ${SCRIPT_ROOT}

# Temp fix to apply patch to oe-core and ignore most postinst intercepts until we know why and can fix it
cp ${SCRIPT_ROOT}/temp_fix_postinst.patch ${SCRIPT_ROOT}/oe-core/temp_fix_postinst.patch
cd ${SCRIPT_ROOT}/oe-core && git apply ./temp_fix_postinst.patch 2>/dev/null
cd ../

. ./oe-core/oe-init-build-env ${positionals[@]}
Okay so now it will default to the machine deployment local.conf, what I do next is establish the MACHINE and if it is a docker I remove the hardware layers from bblayers.conf, depending on MACHINE I will do this for all types supported. Finally if docker, we also replace the local.conf from before with our docker version:
# Add MACHINE to local.conf now it has been generated (use sed in event of multiple builds consecutively
if [ -z "$MACHINE" ]; then
	echo "MACHINE has not been set, defaulting to intel-corei7. Possible options include (but not limited to):\n \
	- generic-arm64\n \
	- qemux86-64\n \
	- intel-corei7-64\n \
	- intel-core2-32\n \
	Set the machine by calling export MACHINE=[MACHINE_NAME] before sourcing this script"
	MACHINE=intel-corei7-64
	sed -i "s/MACHINE ??= .*$/MACHINE ??= \"$MACHINE\"/" conf/local.conf
fi

cp ../meta-marte/conf/local.conf.sample conf/local.conf

# Remove layers not needed or causing conflict depending on machine selected
if [[ $MACHINE == "qemux86-64" ]]; then
   sed -i "/${TOPDIR}\/..\/meta-arm\/meta-arm/d" conf/bblayers.conf
   sed -i "/${TOPDIR}\/..\/meta-intel/d" conf/bblayers.conf
elif [[ $MACHINE == "intel-corei7-64" ]]; then
   sed -i "/${TOPDIR}\/..\/meta-arm\/meta-arm/d" conf/bblayers.conf
   sed -i 's/linux-yocto-rt/linux-intel-rt/g' conf/local.conf
elif [[ $MACHINE == "intel-corei7-64-rt" ]]; then
   sed -i "/${TOPDIR}\/..\/meta-arm\/meta-arm/d" conf/bblayers.conf
   sed -i 's/linux-yocto-rt/linux-intel-rt/g' conf/local.conf
elif [[ $MACHINE == "docker" ]]; then
   cp ../meta-marte/conf/docker.local.conf.sample conf/local.conf
else
   sed -i "/${TOPDIR}\/..\/meta-intel/d" conf/bblayers.conf
fi
Finally, as with all yocto, when you’re in bitbake, you want to see it!
# Add a marker to the prompt based on whether or not bitbake is in the
# environment.
if which bitbake >/dev/null; then
	if [[ ! "${PS1}" =~ ^\(bb\).* ]]; then
		export PS1="(bb) $PS1"
	fi
else
	echo "ERROR: 'bitbake' command is not available in the environment."
fi
Okay so that’s our sourcing script, now for the docker config itself, the local.conf you’ll need to build a docker image:
IMAGE_FSTYPES += "container"

IMAGE_LINGUAS_append = " en-us"
#
# This file is your local configuration file and is where all local user settings
# are placed. The comments in this file give some guide to the options a new user
# to the system might want to change but pretty much any configuration option can
# be set in this file. More adventurous users can look at local.conf.extended
# which contains other examples of configuration which can be placed in this file
# but new users likely won't need any of them initially.
#
# Lines starting with the '#' character are commented out and in some cases the
# default values are provided as comments to show people example syntax. Enabling
# the option is a question of removing the # character and making any change to the
# variable as required.

#
# Machine Selection
#
# You need to select a specific machine to target the build with. There are a selection
# of emulated machines available which can boot and run in the QEMU emulator:
#
#MACHINE ?= "qemuarm"
#MACHINE ?= "qemuarm64"
#MACHINE ?= "qemumips"
#MACHINE ?= "qemumips64"
#MACHINE ?= "qemuppc"
#MACHINE ?= "qemux86"
#MACHINE ?= "qemux86-64"
#
# This sets the default machine to be x64 if no other machine is selected:
MACHINE = "qemux86-64"
PREFERRED_PROVIDER_virtual/kernel ?= "linux-dummy"

#
# Threading Management
#
PARALLEL_MAKE ?= "-j 8"
BB_NUMBER_THREADS ?= "12"

# Distribution selection
# Default to MARTe2 image
#DISTRO ?= "MARTe2"

# Clean *most* package work directories
#INHERIT += " rm_work "

# Include buildhistory as it is used by toaster as well as generally
# useful in detecting changes in builds/configurations
INHERIT += " buildhistory "
BUILDHISTORY_COMMIT = "1"

# Generates a "cve/cve.log" in every recipe's work dir.
# https://wiki.yoctoproject.org/wiki/How_do_I#Q:_How_do_I_get_a_list_of_CVEs_patched.3F
#INHERIT += " cve-check "

# Enable fortran
FORTRAN_forcevariable = ",fortran"
RUNTIMETARGET:append:pn-gcc-runtime = " libquadmath"
HOSTTOOLS += "gfortran"
#Add 8GB for use
#IMAGE_ROOTFS_EXTRA_SPACE_append = " + 8000000"

#
# Where to place downloads-intel-corei7-64-intel-corei7-64-intel-corei7-64
#
# During a first build the system will download many different source code tarballs
# from various upstream projects. This can take a while, particularly if your network
# connection is slow. These are all stored in DL_DIR. When wiping and rebuilding you
# can preserve this directory to speed up this part of subsequent builds. This directory
# is safe to share between multiple builds on the same machine too.
#
# The default is a downloads-intel-corei7-64-intel-corei7-64-intel-corei7-64 directory under TOPDIR which is the build directory.
#
DL_DIR ?= "${TOPDIR}/../downloads-intel-corei7-64"

#
# Where to place shared-state files
#
# BitBake has the capability to accelerate builds based on previously built output.
# This is done using "shared state" files which can be thought of as cache objects
# and this option determines where those files are placed.
#
# You can wipe out TMPDIR leaving this directory intact and the build would regenerate
# from these files if no changes were made to the configuration. If changes were made
# to the configuration, only shared state files where the state was still valid would
# be used (done using checksums).
#
# The default is a sstate-cache directory under TOPDIR.
#
#SSTATE_DIR ?= "${TOPDIR}/sstate-cache"

#
# Where to place the build output
#
# This option specifies where the bulk of the building work should be done and
# where BitBake should place its temporary files and output. Keep in mind that
# this includes the extraction and compilation of many applications and the toolchain
# which can use Gigabytes of hard disk space.
#
# The default is a tmp directory under TOPDIR.
#
#TMPDIR = "${TOPDIR}/tmp"


#
# Package Management configuration
#
# This variable lists which packaging formats to enable. Multiple package backends
# can be enabled at once and the first item listed in the variable will be used
# to generate the root filesystems.
# Options are:
#  - 'package_deb' for debian style deb files
#  - 'package_ipk' for ipk files are used by opkg (a debian style embedded package manager)
#  - 'package_rpm' for rpm style packages
# E.g.: PACKAGE_CLASSES ?= "package_rpm package_deb package_ipk"
# We default to ipk:
PACKAGE_CLASSES = "package_deb"
#PACKAGE_FEED_URIS = "http://<local-machine-ip>:5678"
EXTRA_IMAGE_FEATURES += " package-management "

#
# SDK target architecture
#
# This variable specifies the architecture to build SDK items for and means
# you can build the SDK packages for architectures other than the machine you are
# running the build on (i.e. building i686 packages on an x86_64 host).
# Supported values are i686 and x86_64
#SDKMACHINE ?= "i686"

#
# Extra image configuration defaults
#
# The EXTRA_IMAGE_FEATURES variable allows extra packages to be added to the generated
# images. Some of these options are added to certain image types automatically. The
# variable can contain the following options:
#  "dbg-pkgs"       - add -dbg packages for all installed packages
#                     (adds symbol information for debugging/profiling)
#  "dev-pkgs"       - add -dev packages for all installed packages
#                     (useful if you want to develop against libs in the image)
#  "ptest-pkgs"     - add -ptest packages for all ptest-enabled packages
#                     (useful if you want to run the package test suites)
#  "tools-sdk"      - add development tools (gcc, make, pkgconfig etc.)
#  "tools-debug"    - add debugging tools (gdb, strace)
#  "eclipse-debug"  - add Eclipse remote debugging support
#  "tools-profile"  - add profiling tools (oprofile, lttng, valgrind)
#  "tools-testapps" - add useful testing tools (ts_print, aplay, arecord etc.)
#  "debug-tweaks"   - make an image suitable for development
#                     e.g. ssh root access has a blank password
# There are other application targets that can be used here too, see
# meta/classes/image.bbclass and meta/classes/core-image.bbclass for more details.
# We default to enabling only a subset of debug-tweaks.
EXTRA_IMAGE_FEATURES = "empty-root-password allow-empty-password tools-sdk"

#
# Additional image features
#
# The following is a list of additional classes to use when building images which
# enable extra features. Some available options which can be included in this variable
# are:
#   - 'buildstats' collect build statistics
#   - 'image-mklibs' to reduce shared library files size for an image
#   - 'image-prelink' in order to prelink the filesystem image
# NOTE: if listing mklibs & prelink both, then make sure mklibs is before prelink
# NOTE: mklibs also needs to be explicitly enabled for a given image, see local.conf.extended
USER_CLASSES ?= "buildstats"


#
# Runtime testing of images
#
# The build system can test booting virtual machine images under qemu (an emulator)
# after any root filesystems are created and run tests against those images. To
# enable this uncomment this line. See classes/testimage(-auto).bbclass for
# further details.
#TEST_IMAGE = "1"
#
# Interactive shell configuration
#
# Under certain circumstances the system may need input from you and to do this it
# can launch an interactive shell. It needs to do this since the build is
# multithreaded and needs to be able to handle the case where more than one parallel
# process may require the user's attention. The default is iterate over the available
# terminal types to find one that works.
#
# Examples of the occasions this may happen are when resolving patches which cannot
# be applied, to use the devshell or the kernel menuconfig
#
# Supported values are auto, gnome, xfce, rxvt, screen, konsole (KDE 3.x only), none
# Note: currently, Konsole support only works for KDE 3.x due to the way
# newer Konsole versions behave
#OE_TERMINAL = "auto"
# By default disable interactive patch resolution (tasks will just fail instead):
PATCHRESOLVE = "noop"

#
# Disk Space Monitoring during the build
#
# Monitor the disk space during the build. If there is less that 1GB of space or less
# than 100K inodes in any key build location (TMPDIR, DL_DIR, SSTATE_DIR), gracefully
# shutdown the build. If there is less that 100MB or 1K inodes, perform a hard abort
# of the build. The reason for this is that running completely out of space can corrupt
# files and damages the build in ways which may not be easily recoverable.
# It's necesary to monitor /tmp, if there is no space left the build will fail
# with very exotic errors.
BB_DISKMON_DIRS ??= "\
    STOPTASKS,${TMPDIR},1G,100K \
    STOPTASKS,${DL_DIR},1G,100K \
    STOPTASKS,${SSTATE_DIR},1G,100K \
    STOPTASKS,/tmp,100M,100K \
    ABORT,${TMPDIR},100M,1K \
    ABORT,${DL_DIR},100M,1K \
    ABORT,${SSTATE_DIR},100M,1K \
    ABORT,/tmp,10M,1K"

#
# Shared-state files from other locations
#
# As mentioned above, shared state files are prebuilt cache data objects which can
# used to accelerate build time. This variable can be used to configure the system
# to search other mirror locations for these objects before it builds the data itself.
#
# This can be a filesystem directory, or a remote url such as http or ftp. These
# would contain the sstate-cache results from previous builds (possibly from other
# machines). This variable works like fetcher MIRRORS/PREMIRRORS and points to the
# cache locations to check for the shared objects.
# NOTE: if the mirror uses the same structure as SSTATE_DIR, you need to add PATH
# at the end as shown in the examples below. This will be substituted with the
# correct path within the directory structure.
#SSTATE_MIRRORS ?= "\
#file://.* http://someserver.tld/share/sstate/PATH;downloadfilename=PATH \n \
#file://.* file:///some/local/dir/sstate/PATH"


#
# Qemu configuration
#
# By default qemu will build with a builtin VNC server where graphical output can be
# seen. The two lines below enable the SDL backend too. By default libsdl-native will
# be built, if you want to use your host's libSDL instead of the minimal libsdl built
# by libsdl-native then uncomment the ASSUME_PROVIDED line below.
PACKAGECONFIG_append_pn-qemu-native = " sdl"
PACKAGECONFIG_append_pn-nativesdk-qemu = " sdl"
#ASSUME_PROVIDED += "libsdl-native"

# CONF_VERSION is increased each time build/conf/ changes incompatibly and is used to
# track the version of this file when it was generated. This can safely be ignored if
# this doesn't mean anything to you.
CONF_VERSION = "1"
Most of this is pretty standard but the key parts are the package config for qemu, the machine is qemux86_64 and the kernel is set to “linux-dummy”, the image fs type is then set to container. This is the main 4 bits to get a docker running from yocto. Note that we don’t establish whether we’re using systemd or not, that’s because that would break a docker image.
Note: You need the meta-virtualization layer for this to work.
Next we need an image definition:
SUMMARY = "A minimal bootstrap container image"

IMAGE_FSTYPES = "container"

inherit core-image

FORTRAN_TOOLS = " \
         gfortran \
         gfortran-symlinks \
         libgfortran \
         libgfortran-dev \
      "

IMAGE_INSTALL_append = " curl git gdb python3 python3-pip tmux base \
 bison flex wget packagegroup-core-buildessential ${FORTRAN_TOOLS} readline g++ \
 make dpkg-dev areadetector perl marte2 marte2-components-all vim \
 binutils tcpdump nano wget sshfs-fuse packagegroup-python-idunn-test \
 gawk wget git diffstat unzip texinfo gcc \
 chrpath socat cpio python3-pexpect \
 sdn cmake googletest cronie marte-irqaffinity \
"

IMAGE_FEATURES += " ssh-server-openssh tools-sdk"

PREFERRED_PROVIDER_virtual/java-native = "jamvm-native"
PREFERRED_PROVIDER_virtual/javac-native = "ecj-bootstrap-native"

IMAGE_LINGUAS = "en-us"
IMAGE_TYPEDEP_container += "ext4"

# Workaround /var/volatile for now
ROOTFS_POSTPROCESS_COMMAND += "rootfs_fixup_var_volatile ; "

rootfs_fixup_var_volatile () {
 install -m 1777 -d ${IMAGE_ROOTFS}/${localstatedir}/volatile/tmp
 install -m 755 -d ${IMAGE_ROOTFS}/${localstatedir}/volatile/log
}
We need a unique image definition for the ROOTFS_POSTPROCESS command to fixup for volatile storage and also set the Image FS type – I know we set this in the local.conf but best to have multiple sources. We then set typedep to ext4 but I guess this could easily be ext3 or ext2, but I’ve not tested those and ext4 is best.
Okay, so with all this in tow, you can now build a docker capable image – note the word capable, there’s still a few more steps!
Run the commands:
export MACHINE=docker
. ./marte-oe-init-build-env
bitbake container
Once this has completed you’ll have a image in your directory:
[TMP_DIR]/deploy/images/qemux86-64/container-qemux86-64.tar.bz2.
So how do we get this into a docker you may ask? Well, grab this image and put it in it’s own directory. Then make a Dockerfile and simply have it have:
FROM scratch
ADD container-qemux86-64.tar.bz2 /
So what we’re saying to docker here is open a docker image with nothing, then ADD automatically extracts tar.bz2 files so we’re saying, extract this root filesystem to the root directory. And voila! We have a docker image made from our yocto image.
I then achieve producing this in Gitlab similar to my previous build but for docker and then I upload the docker image:
build-docker:
    stage: build-docker
    image: marte-yocto/marte:yocto_latest
    script:
      - export MACHINE=docker
      - source ./marte-oe-init-build-env
      - bitbake container
    timeout: 5 hours 30 minutes
    variables:
       GIT_SUBMODULE_STRATEGY: recursive
    cache:
        key: one-key-to-rule-them-all
        paths:
          - ./*
    tags:
      - yocto
      - docker
    artifacts:
        paths:
            - /yocto/shared/tmp*/deploy/images/*
        expire_in: 1 week

copy_docker:
   stage: copy-docker
   image: marte-yocto/marte:yocto_latest
   tags:
      - yocto
      - docker
   script:
     - cp /yocto/shared/tmp-glibc/deploy/images/qemux86-64/container-qemux86-64.tar.bz2 core.tar.bz2
   artifacts:
        paths:
            - core.tar.bz2
        expire_in: 1 week

create_docker:
   stage: create-docker
   image: docker:19.03.12
   services:
     - docker:19.03.12-dind
   variables:
     IMAGE_TAG: $CI_REGISTRY_IMAGE:yocto_docker
   script:
     - docker login -u $CI_REGISTRY_USER -p $CI_REGISTRY_PASSWORD $CI_REGISTRY
     - docker build --no-cache -t $IMAGE_TAG -f yoctoDocker .
     - docker push $IMAGE_TAG
I do this in 3 stages because my runner can only do some things, admittedly copy docker could be integrated into build docker sure. yoctoDocker is my file which is similar to the above, the docker dind service didn’t seem compatible with my personalised gitlab runner so hence I split the process up.
As you can see, this docker image is now within a container registry on our works gitlab to allow us to run pytest within our yocto image in our pipelines. It’s now as simple as just setting the image:
yocto-test:
    stage: test
    image: git.ccfe.ac.uk:4567/marte-yocto/marte:yocto_docker
    script:
        - mkdir /root
        - ln /home/root/Projects/MARTe2-dev/MARTe.sh /root/marte.sh
        - chmod a+x /root/marte.sh
        - python3 -m pytest -k 'not test_basic_state'
    variables:
        GIT_STRATEGY: clone
        GIT_SUBMODULE_STRATEGY: recursive
    tags:
      - docker
      - ubuntu
    artifacts:
        paths:
            - ./logs/**
        when: always
        expire_in: 1 week
I do a symbolic link here as I don’t want to change the pytests just because my directory structure differs from pytesting to the yocto image. So that seemed easy, the MARTe.sh file in yocto know’s where to pull it’s actual application and libraries from so this works fine as an easy solution.
And that’s it! I now am pytesting a dockerised yocto image in my Gitlab pipelines as well as actually building yocto in Gitlab pipelines. It’s all automated :).